Posts

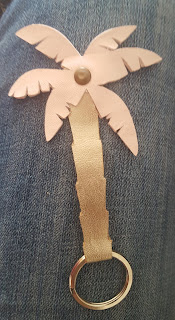
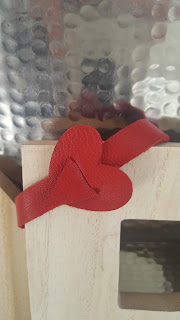
The Best Way to Cut Real Leather with Cricut!!! Finally!!

Image
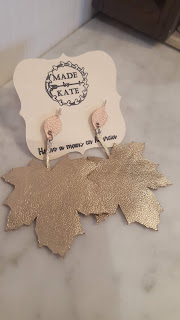
Hi everybody! Well, a few months ago I had a great idea to start an etsy business. I live in sunny Spain where we have a very high quality leather at a very reasonable price. So I got to experimenting what I could make with my cricut machine. Long story short i could get it to cut real leather all the way. The leather wouldn't cut all the way through or it would snag on the blade and get ripped off the mat... Until now! I've found that the best setting for cutting all types of real leather is the Faux suede setting. It cuts each cut only twice and you can test to see if it has cut all the way through by picking up a corner with the weeding tool. If it hasn't cut all the way through just hit the C button again and it will make another pass. I have made very intricate cuts using this method. Happy Cutting!! BTW check out my etsy shop!! https://www.etsy.com/shop/Manuchic?ref=search_shop_redirect

Palmera Llavero Palm tree Keychain

Image
Hola! Hoy vamos a hablar de como hacer una llavero de cuero con la forma de una palmera para las llaves de la casa en la playa. Hi! Today I'm going to show you how to make this super cute palm tree keychain. I have the cricut explore air 2 but if you don't you can still cut this out by hand. The leaves of the palm have been mirrored so that when you glue them together to wrong side facing the wrong side of the leather they match up perfectly. I did add a stud to secure it better but you could just glue it. The trunk just folds on itself with a little glue holding it together. Here's the free palm tree template: palm tree keychain template Tengo un Cricut explore air 2 pero si no la tienes puedes cortar lo a mano.  Aquí tienes la plantilla para hacer lo: plantilla palmera. Las hojas están dibujadas con espejo para que cuando los tienes que pegar se queda bien. El trunco se dobla por la mitad y ya está. Aqui esta la maquina que he usado para hacer

Pulsera de Cuero: Flecha y Corazon

Image
I love this bracelet it's super cute and super easy to make, but if you're not feeling crafty you can buy it on my new etsy shop! https://www.etsy.com/shop/Manuchic?ref=search_shop_redirect Hopefully this week I will be able to upload a step by step and even a free template to cute by hand or with your cutting machine! Ok so here's the really cool thing, I could share the whole project since I only used the shapes in design studio! So here it is:  https://design.cricut.com/#/design/107977808 Leather accessories are really in style now and this is just a straight cut.   Hola Chicos! Acabo de comprar la cuchilla para cortar cuero para mi Cricut Explore Air. Este es mi primer proyecto con el, muy chulo no? Leather arrow bracelet, leather jewelry. Leather arrow bracelet, leather jewelry.Leather arrow bracelet, leather jewelry.Leather arrow bracelet, leather jewelry.Leather arrow bracelet, leather jewelry.Leather arrow bracelet, leather jewelry.Leath

Maceteros de hierro

Image
He plantado este macetero porque así se necesita menos agua. Aquí en Murcia en un balcón con sol toda la tarde es muy importante. Aquí hay los pasos para plantar el macetero sin sus maceteros de plástico. 1. Hay que elegir plantas que tienen caída como el típico gitanica y alguna planta más alta, yo usé un mini rosal Buenas plantas con caída para mucho sol son: romera prostrata uno que trepa, minta aguanta mucho sol, tomillo también es bueno usar hierbas si el balcón está cerca de la cocina. Luego he rellenado con boniatos que tienen hojas muy bonitos verde pálido y es un viña. Y cactus y suculentos. 2. Necesitas poner una malla para que no caiga la tierra. Normalmente en USA usan musgo pero como aquí no sabía donde encontrarlo he usado tela metálica(para mosquiteros) el corcho para Ramos de flores es verde. Los dos cosas los compré en un chino. 3. Como mi macetero era un poquito baja he subido la tela un par de dedos para que cupiera más tierra. 4. La tela lo he sujetado c

Estor de lino

Image
Este fin de pondré el paso a paso de este estor de lino. Os digo ahora los más difícil fue cortar la tela recta por que el mío fue tan grande 160 x 180. Lo demás fue muy fácil

Joyero de exposición

Image
Esto es algo que te sirve de decoración y de un sitio útil para guardar tus collares y pendientes. 1. Hay que comprara un marca que tenga bastante fondo como este que compré en Ikea por 10€. 2. Vas a forrar el fondo con corcho. Yo tenía una tabla de corcho viejo pero a desmontar lo descubrí con era solo una capa muy fina de corcho y lo demás era cartón. Supongo si no tienes corcho que podías usar sólo corcho directamente. 3. Para pegar lo a el fondo uso silicona con una pistola para calentar lo. 4. Ahora se puede forrar eso con tela. Yo elegí una imitación seda un coló hueso, así se ve los collares mejor. 5. Ya esta montas el marco sin el cristal y pones alfileres para colgar los collares.

Fundas de almohadas custom Zara Home

Image
Compre esta funda en Zara Home porque tengo almohadas de 75 cm y no encuentro ninguna que me vienen. Paso a paso: 1. Cortar la funda por la mitad. 2. Poner las fundas al revés y coser donde has cortado. 3 Cortar un trozo de tela para poner al final de la funda para alargarla. Yo usé lo que corté de las cortinas. 4. Dobla 2cm y plancha. 5. Juntar las dos puntas de la tela 6. Mete la parte final de la funda entre la nueva tela como un sándwich y coser para cerarla. Ya está tienes dos fundas por 10€